
इंटरनेट पर जितने भी ब्लॉग है हिंदी हो या इंग्लिश सभी का डिज़ाइन अलग – अलग है उनमें से सभी की एक अलग पहचान है आपको मालूम है की उनकी पहचान क्यों है ? क्योंकि उन्होंने हर एक काम जरा हट कर किया, ब्लॉग का नाम से लेकर उसपर उपलब्ध जानकारी और साइट के डिज़ाइन तक जिसके कारण आज उनकी पहचान है यदि आप भी इंटरनेट पर नाम और पहचान दोनों प्राप्त करना चाहते है तो आपको भी कुछ हटके करना पड़ेगा,
WordPress Blog design kaise or kyon kare
Indian Hindi Blogger को मैंने देखा है की वो खुद का डिज़ाइन करने के बजाय किसी पॉपुलर ब्लॉग की डिज़ाइन कॉपी करते है वे खुद की डिज़ाइन बनाने के बजाये दूसरे ब्लॉग की डिज़ाइन कॉपी कैसे करें यही सोचते रहते है मै उन ब्लॉगर से कहना चाहता हूँ की आप भले ही ब्लॉग का डिज़ाइन Simple रखे लेकिन किसी का कॉपी मत करें, [ एक ब्लॉगर हूँ लेकिन उससे पहले एक रीडर हूँ और Same design वाले ब्लॉग देख कर उसपर विजिट करने का भी मन नहीं करता ] वही अगर ब्लॉग का design बिल्कुल Simple है तो वह कॉपी वाले डिज़ाइन से 100% बेहतर है क्योंकि रीडर्स भी Simple design वाले ब्लॉग को पसंद करते है
Simple design मतलब ये कतई नहीं है की वेबसाइट बना कर छोड़ दे बल्कि उसमे भी थोड़ा बहुत फीचर्स को add / Remove करना पड़ता है इस पोस्ट मे एक Simple लेकिन अट्रैक्टिव डिज़ाइन के बारे मे बता रहा हूँ जिससे रीडर कभी irritate नहीं होते बल्कि उसपर ज्यादा समय बिताते है
साइट डिज़ाइन होने से वेबसाइट Seo पर भी फर्क पड़ता है आपकी जानकारी के लिए बता दे की, Bounce Rate, जो की Black Hat Seo का हिस्सा है साइट का डिज़ाइन ख़राब हो तो रीडर्स जल्दी साइट से leave कर जाते है जिसका नतीजा होता है की Bounce Rate Increase होता है जो ब्लॉग के लिए नुकसानदायक है
यहाँ मै आपको Simple Site design के बारे मे बता रहा हूँ, वैसे तो आप जैसा चाहे वैसा साइट डिज़ाइन कर सकते है लेकिन उसके लिए आपको Coding की जानकारी होना जरुरी है इसके अलावा बिना coding की जानकारी के भी WordPress Blog design कर सकते है इसके लिए Page builder plugin आते है लेकिन इनका भी इस्तेमाल करने आना चाहिए वही मै आपको Simple design के बारे मे बता रहा हूँ जिसमे कही – कही Coding की जरुरत भी पड़ती है लेकिन घबराने की बात नहीं मैंने वो Code यहाँ दे दिया है
WordPress Blog design kaise kare
वर्डप्रेस ब्लॉग डिज़ाइन करने से पहले उसे Customize करना जरुरी है यदि अभी तक आपने Blog को Customise नहीं किया है तो पहले Customise कर ले Customise करना नहीं आता तो इसके लिए मैंने पोस्ट लिखा है आप वो पढ़े वहां सम्पूर्ण जानकारी दिया है WordPress Blog Customise kaise kare
Blog design करने के लिए एक थीम का होना जरुरी है वर्डप्रेस के अधिकतर थीम होते है जो by डिफाल्ट उनका डिज़ाइन होता है मतलब की पहले से design होता है उसे खुद से design करने की जरुरत नहीं, लेकिन आप उसे जैसे चाहे Customise कर सकते है वही कई सारे थीम को ब्लॉग मे अपलोड करने के बाद खुद से डिज़ाइन करना पड़ता है तो चलिए जानते है की ब्लॉग डिज़ाइन कैसे करें
WordPress Blog design kaise kare
[ Note ; मै इस tutorial मे Generatepress theme के बारे मे बता रहा हूँ वैसे यहाँ जितने भी सेटिंग बताए गए है वो सभी Coding के द्वारा किया जा सकता है जो की बाकि के theme मे भी Work करता है ]
किसी भी ब्लॉग का 1 layout होता है उसमे कई सारे पार्ट होते है लेकिन लगभग ब्लॉग मे 4 Section होते है
- Header
- Body
- Sidebar
- Footer
1.Header – सबसे पहले Header डिज़ाइन करना है यदि आप ब्लॉग मे प्रीमियम थीम यूज़ करते है तो Background Color Change, Height, Width Toogle Size, Sticky Navigation आदि कर सकते है नेविगेशन मेनू ऐड कर सकते है और सबसे महत्वपूर्ण Logo ऐड कर सकते है ये सभी फीचर्स free or premium theme मे होता ही है ब्लॉग बनाने के बाद सबसे पहले इसका डिज़ाइन करें डिज़ाइन मे ऊपर जो बताया है वही करना है जो कोई भी कर सकता है

Logo Centering – साइट के अनुसार Background Color Choose करें, Font size रखे, Width, height Set करें यदि आप वर्डप्रेस ब्लॉग पर Generatepress theme use करते है और Navigation menu मे Logo Center मे रखना चाहते है तो नीचे दिए गए कोड को WordPress appearance >> Customise >> additional css मे डाले
.inside-header { display: -webkit-box; display: -ms-flexbox; display: flex; -webkit-box-align: center; -ms-flex-align: center; align-items: center; } .header-widget { order: 10; overflow: visible; } .nav-float-right .header-widget { top: auto; } .nav-float-right .header-widget .widget { padding-bottom: 0; } .site-branding, .site-logo { position: absolute; left: 50%; -webkit-transform: translateX(-50%); transform: translateX(-50%); z-index: 200; } #mobile-header .mobile-bar-items { -webkit-box-ordinal-group: 5; -ms-flex-order: 4; order: 4; margin-left: auto; } #site-navigation { float: none; width: 100%; } .main-navigation:not(.slideout-navigation):not(.mobile-header-navigation) .main-nav > ul { display: -webkit-box; display: -ms-flexbox; display: flex; } .main-navigation .menu-item-separator { -webkit-box-flex: 1; -ms-flex-positive: 1; flex-grow: 1; } .main-navigation .menu-item-separator a { font-size: 0; background: transparent !important; } .slideout-navigation .menu-item-separator, .main-navigation.toggled .menu-item-separator{ display: none !important; } @media (max-width: 768px) { .inside-header>:not(:last-child):not(.main-navigation) { margin-bottom: 0; } } Sticky Navigation – वही यदि Menu को Sticky बनाना चाहते है तो इसकी सेटिंग Appearance > Customize > Layout > Sticky Navigation. मे मिल जाएगा इसके अलावा आप कोड भी ऐड कर सकते है इसे Customise >> additional Css मे डालना करना है
 .site-header {
  position: sticky;
  position: -webkit-sticky;
  top: 0;
   }
Mobile header – Mobile header main Navigation का कलर बदलना चाहते है तो नीचे दिए गए css Add करें
mobile-header .main-nav {
background-color: #0e0e0e;
}
ये सभी Header section के लिए महत्वपूर्ण है इसका सेटिंग अनिवार्य है बाकि की सेटिंग आप खुद भी कर सकते है यदि आपको नहीं आता तो आप हमसे पूछ सकते है
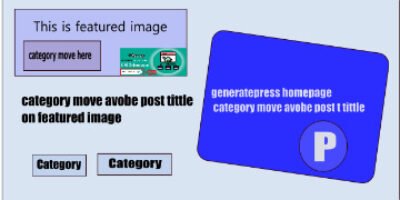
2. Body Section ; यहाँ 2 section होते है एक Homepage body, दूसरा Single Content body, Homepage design के लिए Coding Knowledge Required है इसके अलावा Page builder plugin से कर सकते है Homepage By default भी रहे तो भी ठीक है
Single Content body – इसकी designing ज्यादा Simple ही होता है लेकिन इसमें भी कुछ फीचर्स को ऐड करके Single page को अट्रैक्टिव बनाया जा सकता है

Single pages मे पोस्ट के ऊपर BreadCrumbs – Author Image, Name last update date, पोस्ट से पहले show किया जाता है और पोस्ट के नीचे Share button, Email Newsletter, Author bio widget Related Post होता है जो की एक general blog मे होता ही है
add share button below Post
वर्डप्रेस ब्लॉग मे बिना प्लगइन शेयर बटन ऐड करना है तो नीचे के कोड इस्तेमाल करें इसे Function.php file मे डाले और Css को Appearance >> Customise >> Additional Css मे डाले
Function hindivhelp_social_sharing_buttons($content) {global $post;if(is_singular() || is_home()){// Get current page URL$hindivhelpURL = urlencode(get_permalink());// Get current page title$hindivhelpTitle = str_replace( ' ', '%20', get_the_title());// Get Post Thumbnail for pinterest$hindivhelpThumbnail = wp_get_attachment_image_src( get_post_thumbnail_id( $post->ID ), 'full' );// Construct sharing URL without using any script$twitterURL = 'https://twitter.com/intent/tweet?text='.$hindivhelpTitle.'&url='.$hindivhelpURL.'&via=hindivhelp';$facebookURL = 'https://www.facebook.com/sharer/sharer.php?u='.$hindivhelpURL;$whatsappURL = 'whatsapp://send?text='.$hindivhelpTitle . ' ' . $hindivhelpURL;$linkedInURL = 'https://www.linkedin.com/shareArticle?mini=true&url='.$hindivhelpURL.'&title='.$hindivhelpTitle;// Based on popular demand added Pinterest too$pinterestURL = 'https://pinterest.com/pin/create/button/?url='.$hindivhelpURL.'&media='.$hindivhelpThumbnail[0].'&description='.$crunchifyTitle;// Add sharing button at the end of page/page content$content .= '<!-- https://www.hindivhelp.co.in social sharing. Get your copy here: https://www.hindivhelp.co.in -->';$content .= '<div class="hindivhelp-social">';$content .= '<h5>SHARE ON</h5> <a class="hindivhelp-link hindivhelp-twitter" href="'. $twitterURL .'" target="_blank">Twitter</a>';$content .= '<a class="hindivhelp-link hindivhelp-facebook" href="'.$facebookURL.'" target="_blank">Facebook</a>';$content .= '<a class="hindivhelp-link hindivhelp-whatsapp" href="'.$whatsappURL.'" target="_blank">WhatsApp</a>';$content .= '<a class="hindivhelp-link hindivhelp-buffer" href="'.$bufferURL.'" target="_blank">Buffer</a>';$content .= '<a class="hindivhelp-link hindivhelp-linkedin" href="'.$linkedInURL.'" target="_blank">LinkedIn</a>';$content .= '<a class="hindivhelp-link hindivhelp-pinterest" href="'.$pinterestURL.'" data-pin-custom="true" target="_blank">Pin It</a>';$content .= '</div>';return $content;}else{// if not a post/page then don't include sharing buttonreturn $content;}};add_filter( 'the_content', 'hindivhelp_social_sharing_buttons');
Css code 👇
@media screen and (min-width: 1024px) {
 .hindivhelp-whatsapp {
display: none !important;
 }
}
.hindivhelp-link { padding: 2px 8px 4px 8px !important;
color: white;
font-size: 12px; border-radius: 2px; margin-right: 2px;
 cursor: pointer;
 -moz-background-clip: padding;
-webkit-background-clip: padding-box;
 box-shadow: inset 0 -3px 0 rgba(0,0,0,.2);
 -moz-box-shadow: inset 0 -3px 0 rgba(0,0,0,.2);
 -webkit-box-shadow: inset 0 -3px 0 rgba(0,0,0,.2);
 margin-top: 2px;
 display: inline-block;

text-decoration: none;
}
.hindivhelp-link:hover,.hindivhelp-link:active {
color: white;
}
.hindivhelp-twitter {
 background: #00aced;
}
.hindivhelp-twitter:hover,.hindivhelp-twitter:active {
 background: #0084b4;
}
.hindivhelp-facebook { background: #3B5997;
}
.hindivhelp-facebook:hover,.hindivhelp-facebook:active {
background: #2d4372;
}
.hindivhelp-buffer { background: #444;
}
.hindivhelp-buffer:hover,.hindivhelp-buffer:active {
background: #222;

}
.hindivhelp-pinterest {
background: #bd081c;
}
.hindivhelp-pinterest:hover,.hindihelp4u-pinterest:active {
background: #bd081c;
}
.hindivhelp-linkedin {
background: #0074A1;

}
.hindivhelp-linkedin:hover,.hindihelp4u-linkedin:active {
background: #006288;

}
.hindivhelp-whatsapp { background: #43d854;

}
.hindivhelp-whatsapp:hover,.hindihelp4u-whatsapp:active {
background: #009688;

}
.hindivhelp-social {
margin: 20px 0px 25px 0px;
-webkit-font-smoothing: antialiased;
font-size: 12px;
}
add Related Post
Related Post ऐड करने के लिए कई सारे प्लगइन आते है Generatepress मे Without प्लगइन रिलेटेड पोस्ट ऐड करना संभव नहीं है इसके लिए प्लगइन जरुरी है ये पढ़े.. best Related Post plugin list इसमें मैंने best or lightweight related post plugin के बारे मे बताया है

add Email Newsletter below post
भले ही आज Push Notifiaction ज्यादा ब्लॉग पर यूज़ होता है लेकिन फिर भी Email Marketing आज भी सबसे फायदेमंद तरीका है इसके लिए ब्लॉग पर Email newsletter form add करना जरुरी है वैसे तो ये Sidebar footer मे भी अच्छा रहता है लेकिन ब्लॉग पोस्ट के नीचे रहने से काफ़ी फायदेमंद होता है
Newsletter Widget पोस्ट के नीचे ऐड करने के लिए Coding or plugin दोनों इस्तेमाल कर सकते है प्लगइन से करना चाहते है तो ये पढ़े.. best Email newsletter plugin for wordpress, Or Coding से करना चाहते है तो ये पढ़े.. WordPress Me Email Newsletter Widget kaise add kare
Author bio widget
ब्लॉग के लेखक Team के बारे मे छोटा सा डिस्क्रिप्शन होता है जिससे रीडर्स ये जान सके की ब्लॉग के लेखक कौन है वे क्या करते है वो कहाँ रहते है उसे Author Bio कहते है ये widget अधिकतर ब्लॉग मे होता हो वो भी पोस्ट के बिल्कुल नीचे यदि आप भी add करना चाहते है तो नीचे दिए गए कोड को Theme section मे Function.php file मे peste कर दे और Second code ( Css ) को Customise >> additional css box मे Peste कर दे

function wpb_author_info_box( $content ) {
global $post;
// Detect if it is a single post with a post author
if ( is_single() && isset( $post->post_author ) ) {
// Get author’s display name
$display_name = get_the_author_meta( ‘display_name’, $post->post_author );
// If display name is not available then use nickname as display name
if ( empty( $display_name ) )
$display_name = get_the_author_meta( ‘nickname’, $post->post_author );
// Get author’s biographical information or description
$user_description = get_the_author_meta( ‘user_description’, $post->post_author );
// Get author’s website URL
$user_website = get_the_author_meta(‘url’, $post->post_author);
// Get link to the author archive page
$user_posts = get_author_posts_url( get_the_author_meta( ‘ID’ , $post->post_author));
if ( ! empty( $display_name ) )
$author_details = ‘
About ‘ . $display_name . ‘
‘;
if ( ! empty( $user_description ) )
// Author avatar and bio
$author_details .= ‘
‘ . get_avatar( get_the_author_meta(‘user_email’) , 90 ) . nl2br( $user_description ). ‘
‘;
// Check if author has a website in their profile
if ( ! empty( $user_website ) ) {
} else {
// if there is no author website then just close the paragraph
$author_details .= ‘
‘;
}
// Pass all this info to post content
$content = $content . ‘
‘ . $author_details . ‘
‘;
}
return $content;
}
// Add our function to the post content filter
add_action( ‘the_content’, ‘wpb_author_info_box’ );
// Allow HTML in author bio section
remove_filter(‘pre_user_description’, ‘wp_filter_kses’);
Css code 👇
| .author_bio_section{ background-color: #f2f2f2; padding: 15px; border: 1px solid #ccc; } .author_name{ font-size:15px; font-weight: bold; } .author_details img { border: 1px solid #D8D8D8; border-radius: 50%; float: left; margin: 0 12px 12px 0; } |
[ Note ; उससे पहले WordPress dashboard User Profile मे खुद का Bio लिखना जरुरी है तभी Author details Show होगा ]
ये कुछ महत्वपूर्ण फीचर्स है जो Single page मे होते है वैसे इसके अलावा भी आप अपने पसंदीदा फीचर्स ऐड कर सकते है Single page body designing का काम खत्म अब sidebar Design के बारे मे जानते है Sidebar किसी भी ब्लॉग के लिए बहुत मायने रखता है
3. Sidebar design ; Sidebar मे महत्वपूर्ण widget होते है जैसे की Latest Post, Popular Post, Updated Post, Social media Following Widget, Category आदि होता है वैसे ये सब जरुरत के अनुसार ऐड किया जाता है कई सारे Theme मे by default इनमे से कुछ widgets होते है वही कुछ मैन्युअली ऐड करना होता है

Add Popular Post
वर्डप्रेस मे पॉपुलर पोस्ट widget add करने के लिए Code use कर सकते है या फिर प्लगइन यूज़ कर सकते है यदि विथाउट प्लगइन ऐड करना चाहते है तो आप इस आर्टिकल को पढ़े.. Add popular post without plugin
Add latest Post
लेटेस्ट पोस्ट widget से रीडर्स को ये पता चलता है की ब्लॉग पर नया – नया क्या पोस्ट हुआ है रीडर्स वैसे ब्लॉग को ज्यादा Like करते है जो हमेशा अपडेट होता रहता है इसलिए latest post widget होना जरुरी है Latest post add करने के लिए Recent plugin with Thumbnail है आप इसे Use कर सकते है
प्लगइन इनस्टॉल करके Appearance >> Widget
मे जाकर Recent Post with thumbnail पर क्लिक करें area select करें और Add कर दे wordpress plugin upload install activate kaise kare
Category widget
WordPress Widget section मे डिफाल्ट होता है मतलब की इसके लिए किसी भी प्रकार के प्लगइन और सेटिंग की जरुरत नहीं ये पहले से ही उपलब्ध होता है सिर्फ Widget section मे जाकर Area choose करके ऐड कर दे, आप चाहे तो केटेगरी मे आइकॉन भी ऐड कर सकते है ये पढ़े.. Category me icon kaise add kare
Social Media Following widget
Social media following widget की मदद से रीडर्स को ये पता चलता है की इतने सारे लोग इस ब्लॉग से जुड़े हुए है इसके साथ ही रीडर्स आसानी से ब्लॉगर से जुड़ सकते है इसलिए social media following widget ऐड करना जरुरी है
नीचे दिए गए कोड को widget section मे Custom Html >> Area select >> box मे peste करके Save & Done कर दे
<div id="smisocialicons">
<a href="https://www.facebook.com/hindivhelp/" title="Facebook" target="_blank" rel="nofollow"><i class="fa fa-facebook"></i></a>
<a href="https://twitter.com/successbranch" title="Twitter" target="_blank" rel="nofollow"><i class="fa fa-twitter"></i></a>
<a href="https://in.pinterest.com/successbranch/" title="Pinterest" target="_blank" rel="nofollow"><i class="fa fa-pinterest"></i></a>
<a href="https://www.instagram.com/successbranch/" title="Instagram" target="_blank" rel="nofollow"><i class="fa fa-instagram"></i></a>
<a href="https://www.YouTube.com/channel/UCaBv-okD882yNM-570zYaAw/" title="Youtube" target="_blank" rel="nofollow"><i class="fa fa-youtube"></i></a>

</div>
<link rel="stylesheet" href="https://maxcdn.bootstrapcdn.com/font-awesome/4.4.0/css/font-awesome.min.css" />
Css code नीचे दिया गया css code है जो इस बटन को स्टाइलिश बनाता है इस कोड को कॉपी कर ले Appearance >> Customise >> additional css box मे कही भी peste कर दे. और publish कर दे
#smisocialicons {
text-align: center;
}
#smisocialicons a {
background: #252525;
border: 2px solid #000;
color: #fff;
display: inline-block;
font-size: 16px;
width: 38px;
height: 38px;
line-height: 38px;
margin: 0 1px 8px;
}
[ Note ; Css code से Icon size, background color Change कर सकते है #000000 की जगह अपने अनुसार Color code add करें width height बढ़ा घटा सकते है ]
वैसे यहाँ बताए गए Sidebar widget एक normal blog मे होता है designing के लिए काफ़ी अच्छा है So use करना चाहिए हमने यहाँ Header, Body, Sidebar designing के बारे मे बताया अभी बचा last Section वो है Bottom/ Footer section.
4. Footer design – Footer/Bottom से साइट का End डिज़ाइन होता है यहाँ साइट के महत्वपूर्ण लिंक डाले जाते है अब वो लिंक किस तरह डाले जिससे साइट आकर्षक दिखे मतलब की Horizontal, Ya Vertical, ये साइट के अनुसार होता है दोनों सही है आप कोई भी इस्तेमाल कर सकते है Footer मे links के अलावा Personal Contact details, या फिर कोई extra widgets add कर सकते है

Pages add in footer
Blog के footer section मे pages का होना बहुत जरुरी है ये designing के लिए भी और रीडर्स के लिए भी लगभग सारे ब्लॉग वेबसाइट के पेजेज को footer / bottom section मे देखा होगा क्योंकि ये परफेक्ट place है Footer मे पेज ऐड करने के लिए आप ये पोस्ट पढ़े.. WordPress Footer me page kaise add kare
Footer background color change
ब्लॉग मे color भी काफ़ी मायने रखता है इसलिए Footer का background color change करना जरुरी है उसके लिए नीचे दिए गए Css Use करें
.site-footer {
  background-color: #fff;
  color: #000;
}
लगभग एक Simple blog design हो चूका है अभी तक के अनुभव के आधार पर मै सिर्फ यही कह सकता हूँ की ब्लॉग का Clean and Simple interface सभी को पसंद आता है इसलिए जितना हो सके ब्लॉग को Clean Interface रखे
ब्लॉग को जैसे चाहे वैसे डिज़ाइन कर सकते है लेकिन ज्यादा designing के लिए Css, Html जैसे Coding का knowledge होना बहुत जरुरी है तभी proffessionaly design किया जा सकता है इसके अलावा Page builder Plugin है इसमें Coding की required नहीं है आप उसका इस्तेमाल कर सकते है Blog design के लिए
मैंने यहाँ जितने भी तरीका बताया है वो सभी एक general blog मे होता है आपको लगे की इसमें कुछ और ऐड होना चाहिए तो आप हमें बताए
आपको लगे की ये पोस्ट वास्तव मे उपयोगी है तो अपना कीमती फीडबैक देना ना भूले साथ ही जरा सा समय हो तो इसे सोशल साइट्स पर जरूर शेयर करें